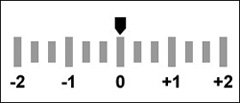
The light meter is used whilst taking a photograph to make sure that the image is correctly exposed, for it to be correctly exposed the arrow has to be on zero. If the arrow is below zero which is to the left this means the image is under exposed and if it is above zero which is to the right the image will be over exposed. To get the correct exposure the aperture, shutter speed and ISO all have to be correctly in sync whilst using the light meter to make sure these settings are correct to have the right exposure.
For this experimental task we looked at getting correct exposures using the cameras built in light meter.


For the second task of this section I was then asked to over expose the image also changing the aperture only, but with the aperture on the highest it could go on I could not get an image over exposed by only changing the aperture, so i changed the ISO to 3200, with the aperture on f4.8 and keeping the shutter speed on 1/60, to make sure this image was over exposed I made sure that the was over 0 on the light meter.


Secondly I was asked to take an over exposed image using the same rule of only changing the shutter speed. To do this I changed the shutter speed to 1/30 and kept the aperture at f5 and ISO at 800 and with these settings I was able to get an under exposed image by changing the shutter speed to make it slower which allows in more light.


Lastly, using the same rule of changing the ISO only, I was asked to take an over exposed image. To get this image I changed the ISO to 3200 with a shutter speed of 1/60 and aperture of f5.6 and with these settings I was able to get this over exposed image by choosing a higher ISO number.
No comments:
Post a Comment